How to create a dynamic form using React JS
Written by Mauricio Lopez
Tutorials

## Introduction
React JS is a JavaScript library for building user interfaces. It lets you create reusable components so that your code is easy to read and maintain. When a user interacts with a React component, React updates the component automatically. This makes your app more responsive and fast.
React JS allows developers to create forms that change based on user input. This can be extremely useful for creating custom forms that are specific to a particular use case. Additionally, React JS helps to keep forms organized and easy to navigate.
In this tutorial, we will go through the steep so you understand how to do it in an easy way. Let’s get started with creating a simple form using React JS.
First of all, you may wonder what is a form! Let me put it simply this way- a form is an empty entity that might hold different values in it. It can be any type of value like name, age, address, email, number, etc. Here we’ll create a simple and static form that shows two rows.
```
import './App.css';
function App() {
return (
);
}
export default App;
```
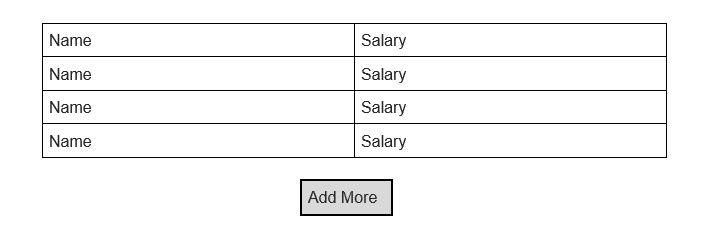
As you can see in the above example I have created two different input fields, which take “Name” and “Salary” values as inputs. However, the form is static. It can only accept the values, but can not do something with those values. The created form looks like this.
);
}
export default App;
```
Boom! We are done. The above code will create a set of input fields with the properties “Name” and “Salary” since I’ve used one object in our state. We can increase the number of pairs anytime by adding more objects to the state.
Moreover, we can simply add the values from the

inputFields state to the input fields by doing–
```
```
And the process is the same for the “Salary” property.
Let's imagine a real-time situation where we are in need of adding more fields to our form since our existing input fields are not sufficient. To solve the issue we may create a button named “Add More” that will create a new pair of input fields while clicking. Let’s make the button first.
```
```
Now we need a function that will work beneath this button. This function will trigger only when someone clicks the “Add More” button.
```
const addFields = () => {
}
```
And now, let’s connect the function to our button by simply adding an `onClick` event.
`<button onClick={addFields}>Add More</button>`.
So far so good! Our physical structure is ready. Now, we need to create a function that will create a new empty field every time we click the “**Add More**” button. Therefore, we need to make an object inside the `addFields` function, which will cause the result. This object will go back to the `inputFields` state while clicking and creating a new input field.
```
const addFields = () => {
let newField = { name: '', salary: '' }
}
```
Now, we can put this `newField` object inside the `inputFields` state so that it can automate the process.
```
const addFields = () => {
let newField = { name: '', salary: '' }
setInputFields([...inputFields, newfield])
}
```
e.preventDefault() that will prevent the page from getting refreshed. So that, the information becomes safe.
```
const submit = (e) => {
e.preventDefault();
console.log(inputFields)
}
```
Afterward, integrate this function with the “**Submit**” button so that it can send the data and log it in.
```
```
Finally, add this to the form tag.
```

Written by Mauricio Lopez
Mauricio has been at the forefront of technology for +15 years. He is constantly integrating new technologies including frameworks, CMS, and standard industry models. He is a pragmatic problem-solver and customizes solutions based on the best schema/language/application for each project. As the CTO at Jobsity, he ensures that his team is always up to date with the latest advances in software development by researching the software ecosystem, implementing professional development initiatives, and coordinating with new and existing clients about their needs.