How to Create an Angular Todo List App from Scratch

A basic Todo List App enables us to add, remove, and mark a task as completed. The idea seems quite simple but for beginner Angular developers it could be a bit challenging to build it.
So, today I'll help you design a simple and aesthetically pleasing todo app with Angular.
Features of Angular Todo App
- Ability to add a new task.
- Ability to delete a task.
- Ability to mark a task as "completed".
Set up Project
Before writing any code we need to set up the local Angular environment and import the required packages.
Install Angular by following this guide: https://angular.io/guide/setup-local
Create a new Angular project by executing the following command in the terminal.
ng new todo-list-app
Install Required npm Packages
As their name suggests, the first 3 packages are used to add the well-known Material design and Material icons in our project. Whereas, guid-typescript enables us to generate GUID code.
-
npm i materialize-css
-
npm i material-icons
-
npm i material-design-icons
-
npm i guid-typescript
Now that we have installed the packages, it's time to access them for use in our project. To do so, open the /angular.json file.
At first, you need to add the path of 2 CSS files (one for Material icons and the other one for Materialize) in the "styles" attribute.
Old Code Snippet:-
"styles": [
    "src/styles.css"
]
New Code Snippet:-
"styles": [
    "node_modules/material-design-icons/iconfont/material-icons.css",
    "node_modules/materialize-css/dist/css/materialize.min.css",
    "src/styles.css"
]
Similarly, find the "scripts" attribute and replace it with the following code. Basically, we are adding the JavaScript file of Materialize package to make it work correctly with stuff like animations.
"scripts": [
    "node_modules/materialize-css/dist/js/materialize.min.js"
]
Remove HTML Template Code
Angular automatically puts a dummy HTML page in every new project to help us view something on the screen once we run the project. Simply open the /todo-list-app/src/app/app.component.html file and remove its content. Do not delete this file as we will be writing our main HTML code here.
Import Forms Module
We need the Angular forms module to work with the "add new task" form that we'll be creating later. So, let's import it by replacing the following old code snippet with the new one inside the src/app/app.module.ts file.
Old Code Snippet:-
imports: [
    BrowserModule
]
New Code Snippet:-
imports: [
    BrowserModule,
    FormsModule
]
At last, your src/app/app.module.ts file will look something like this.
import { NgModule } from '@angular/core';
import { FormsModule } from '@angular/forms';
import { BrowserModule } from '@angular/platform-browser';

import { AppComponent } from './app.component';

@NgModule({
  declarations: [
    AppComponent
  ],
  imports: [
    BrowserModule,
    FormsModule
  ],
  providers: [],
  bootstrap: [AppComponent]
})
export class AppModule { }
Create a New Model
We need a class to define the structure of data that our to-do list app will use. The best place for this is to create a model.
Let's do that by creating a new folder inside the src folder and naming it as models. Now add a TypeScript file here called todo.model.ts
The path of our newly created file will look something like this: /src/models/todo.model.ts
Now open this file and add the following code to it.
import { Guid } from "guid-typescript";

export class Todo{
    constructor(
        public id: Guid,
        public title: string,
        public isComplete: boolean
    ){  }
}
Code Explanation:
We first imported the guid-typescript package. Basically, it allows us to create a unique ID for every to-do list item. We will later use this ID to identify a specific item and perform operations on it like deleting the task or marking the task as "completed".
In the Todo class, we have used the constructor() method to define 3 properties: id, title, and isComplete.
id: Unique identifier for each to-do list item.title: The name of the task that we'll enter through an input field later.isComplete: A Boolean true/false that inform us whether a task is completed or not.
Write the Business Logic for Todo App
Now it's time to write the main functionality of our todo app. To do so, head over to the /src/app/app.component.ts file and replace its existing code with the following code snippet.
import { Component } from '@angular/core';
import { NgForm } from '@angular/forms';
import { Guid } from "guid-typescript";
import { Todo } from "src/models/todo.model";

@Component({
  selector: 'app-root',
  templateUrl: './app.component.html',
  styleUrls: ['./app.component.css']
})
export class AppComponent {
  todos: Todo[] = []

  onSubmit(form: NgForm){
    let todo = new Todo(Guid.create(), form.value.title, false);
    this.todos.push(todo);
    form.resetForm();
  }

  onComplete(id: Guid){
    let todo = this.todos.filter(x=>x.id === id)[0];
    todo.isComplete = true;
  }

  onDelete(id: Guid){
    let todo = this.todos.filter(x=>x.id === id)[0];
    let index = this.todos.indexOf(todo,0);
    if(index > -1){
      this.todos.splice(index,1);
    }
  }
}
Code Explanation:
At first, we are importing some packages and a model that we will utilize for our todo app.
Component: A Decorator that defines a class as an Angular component.NgForm: It is used to handle the form submission.Guid: Generates a unique ID for each task.Todo: We'll utilize it for creating a new task in the to-do list.
The @Component basically enables us to configure the component.
Now the main AppComponent class contains 1 property and 3 custom-defined methods.
todos: Hold all the tasks inside our to-do list. It can then be used to display the tasks on the screen.
onSubmit(): Creates a new task when the user submits the form.
onComplete(): Mark the task as complete. Basically, we just need to set the isComplete property of a specific task to a Boolean true.
onDelete(): Removes a specific task from todos array based on its ID.
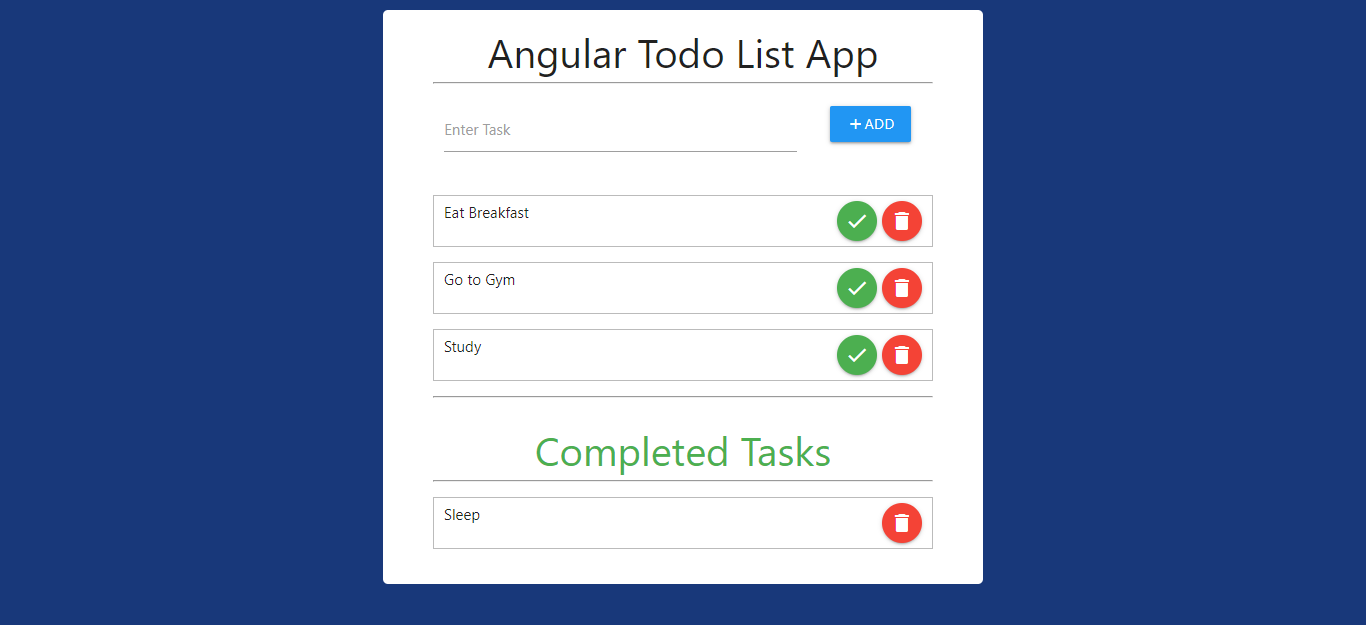
Design the User Interface
Here we'll design the UI of the Angular Todo App using HTML5 and CSS3. I'll also introduce you to some Angular structural directives like *ngIf and *ngFor to perform conditional operations and loop through the collection of tasks in the todos list respectively.
If you want to learn more about Angular structural directives then here's a video I would recommend watching.
Anyways, let's put this code inside src/app/app.component.html file.
<div class="container">
  <h1>Angular Todo List App</h1>
  <hr>
  <form class="todo-form" #f="ngForm" (ngSubmit)="onSubmit(f)">
    <div class="row">
      <div class="input-field col s9">
        <input type="text" name="title" id="title" ngModel>
        <label for="title">Enter Task</label>
      </div>

      <div class="input-field col s3">
        <button type="submit" class="btn waves-effect waves-light blue"><i class="material-icons inline-icon">add</i>Add</button>
      </div>
    </div>
  </form>
  <ul class="todo-list" *ngFor="let todo of todos">
    <li *ngIf="!this.todo.isComplete">
      <div>
        <div>{{this.todo.title}}</div>
        <div>
          <button (click)="onComplete(this.todo.id)" class="btn-floating waves-effect waves-light green"><i class="material-icons">check</i></button>

          <button (click)="onDelete(this.todo.id)" class="btn-floating waves-effect waves-light red"><i class="material-icons">delete</i></button>
        </div>
      </div>
    </li>
  </ul>

  <div *ngIf="!todos?.length" class="msg">
    Your Todo List is Empty!
  </div>

  <hr>
  <br>

  <h1 id="completed-tasks">Completed Tasks</h1>
  <hr>
  <ul class="todo-list" *ngFor="let todo of todos">
    <li *ngIf="this.todo.isComplete">
      <div>
        <div>{{this.todo.title}}</div>
        <div>
          <button (click)="onDelete(this.todo.id)" class="btn-floating waves-effect waves-light red"><i class="material-icons">delete</i></button>
        </div>
      </div>
    </li>
  </ul>
</div>
Code Explanation:
Mainly, our UI is divided into 3 sections.
- A form to create a new task.
- List of incomplete tasks.
- List of completed tasks.
We'll attach an onsubmit event to the form using (ngSubmit)="onSubmit(f)". So, whenever a user enters a task title in the input field and presses the ADD button it gets submitted to the AppController. The onSubmit() method we defined earlier in the AppComponent will then push a new task in the todos array.
We then use *ngFor structural directive to access each task in the todos one by one. After that, we'll check whether the task is complete or not using *ngIf. If it is not complete then display it in the first list with 2 buttons "complete task (check mark icon)" and "delete task (trash can icon)" respectively. Both of these buttons will listen for the onclick event and are handled by onComplete() and onDelete() methods of AppComponent respectively.
After that, I placed another *ngIf directive to check whether the todo list is empty or not. If it is empty then display a message like "Your Todo List is Empty!".
Our code is almost the same for the completed tasks list. But, this time instead of checking !this.todo.isComplete we'll use this.todo.isComplete. Here, we also don't need the "complete task (check mark icon)" button, so I simply removed it.
Let's give a nice background color to the body of our HTML page. As this is a global style, so the best place to add this code is inside the /src/styles.css file.
/* You can add global styles to this file, and also import other style files */
body
{
    width: 100%;
    height: 100vh;
    padding: 10px;
    background-color: #18387a;
}
The styling of our form and to-do list will go inside the src/app/app.component.css file.
.container
{
    width: 600px;
    margin: 0 auto;
    background-color: #fff;
    text-align: center;
    padding: 20px 50px;
    border-radius: 5px;
}

.container h1
{
    font-size: 40px;
    margin: 0;
}

.inline-icon
{
    vertical-align: bottom;
    font-size: 18px !important;
}

.todo-list li
{
    margin-top: 5px;
    border: 1px solid #bbb;
    padding: 5px 10px;
}

.todo-list li div
{
    display: flex;
    flex-direction: row;
    justify-content: space-between;
}

.todo-list button
{
    margin-left: 5px;
}

.msg
{
    color: #bbb;
    margin-bottom: 20px;
}

#completed-tasks
{
    color: #4caf50;
}
Run the Todo App
ng serve -o
By default, the local project will open on the 4200 port.
Conclusion
Now that you know how to make a simple todo app in Angular. I'm sure you have also got a bit more familiar with Angular and how we can use it in real-world apps.
While following along, you had learned the use of programming concepts like conditional statements, loops, arrays, etc. inside HTML code. Similarly, you also got some experience working with HTML form and how to handle its input through events.
Download Source Code
I have compressed the complete source code of our Angular Todo App into a .zip file.
You can download it from the link given below.
DOWNLOAD_BUTTON_HERE
But, remember that I haven't added the node_modules folder in it. Because otherwise, the source code folder would get very heavy.
Now, after downloading this .zip file, simply follow the below-mentioned steps to run the project successfully on your PC.
- Unzip the source code file in a new folder.
- Go to the project folder and execute
npm installcommand in the terminal. Note: Please be patient because this step will take some time to download and install all dependencies. - execute
ng serve -oin the terminal and your project will automatically open in the default web browser.
--
If you want to stay up to date with all the new content we publish on our blog, share your email and hit the subscribe button.
Also, feel free to browse through the other sections of the blog where you can find many other amazing articles on: Programming, IT, Outsourcing, and even Management.


With over +16 years of experience in the technology and software industry and +12 of those years at Jobsity, Santi has performed a variety of roles including UX/UI web designer, senior front-end developer, technical project manager, and account manager. Wearing all of these hats has provided him with a wide range of expertise and the ability to manage teams, create solutions, and understand industry needs. At present, he runs the Operations Department at Jobsity, creating a high-level strategy for the company's success and leading a team of more than 400 professionals in their work on major projects.